
On a premium residential project, the low-voltage requirements should not be left until the electrician is already closing walls and ceilings.
By that stage, the easiest decisions have become expensive decisions. A missing conduit to a TV point can affect joinery. A poor access point location can weaken the Wi-Fi in the main entertainment area. A fibre route that was not allowed for can leave the equipment cabinet compromised. A camera point without serviceable conduit can become difficult to replace later.
This article is written for architects, builders, electricians and project managers who need a practical first-fix reference before DG Technologies arrives on site.
It is not a substitute for a project-specific design. Every home is different. Ceiling depth, wall construction, route length, bends, cabinetry, interior design, equipment choice and final client requirements all matter. But these are the planning rules we want considered early, because they prevent unnecessary rework and protect the finished architecture.
For wider project coordination, also see our architect smart-home specification guide and our page for builders and architects.
Start with the head-end
The head-end is the technical point where the system comes together.
It may be a dedicated rack room, AV cupboard, garage cabinet, server room, DB room or a properly designed equipment cupboard. Whatever the name, the principle is the same: cables need to return to the place where the equipment will live.
The head-end may contain:
- fibre equipment,
- router and firewall,
- network switches,
- PoE switches for cameras and access points,
- patch panels,
- CCTV recorder,
- audio equipment,
- control processors,
- power supplies,
- UPS or backup power,
- HDMI or video equipment,
- and documentation for future support.
Before first fix, the project team should confirm where the head-end will be, how cables will enter it, how much equipment space is available, how ventilation will work and whether it will remain accessible after handover.
A smart home is much easier to maintain when the rack has been planned properly. A beautiful house with a cramped, hot, undocumented equipment cupboard will eventually become frustrating to support.
Wi-Fi access point requirements
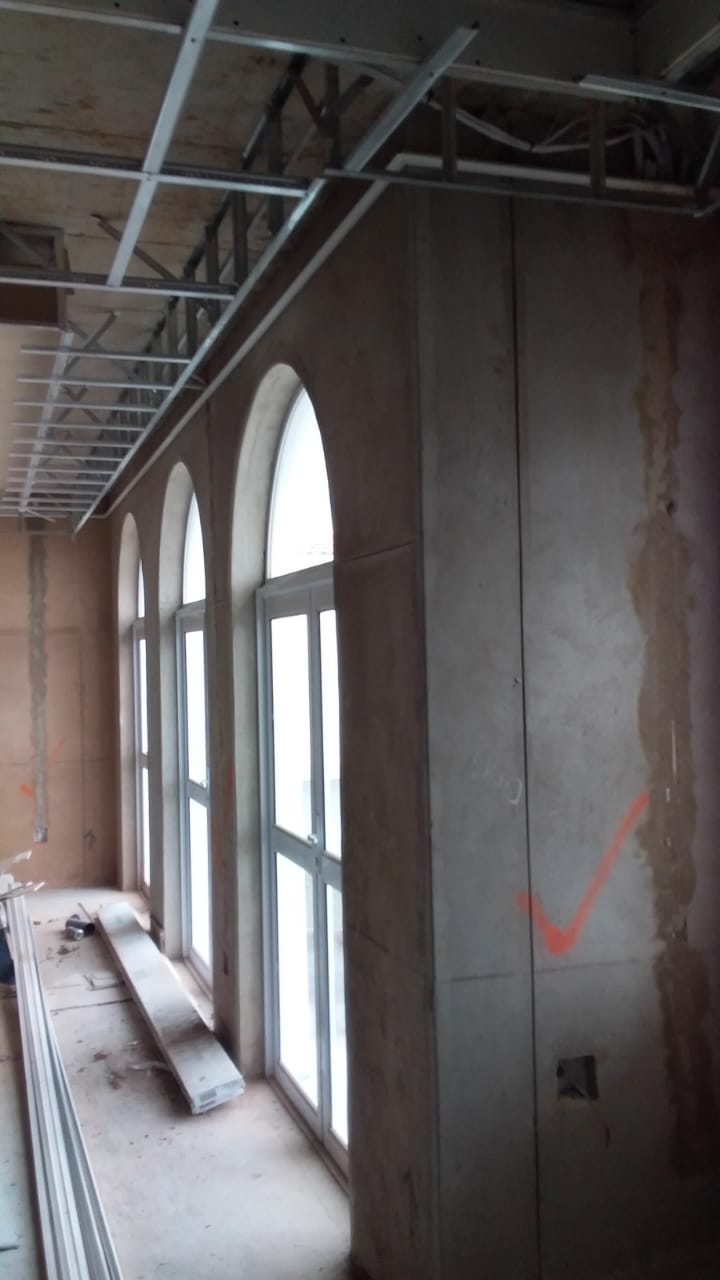
Wi-Fi access points should be planned before ceilings close.
In a serious home, Wi-Fi should not depend on a router hidden in a cupboard and a few extenders added later. Access points need proper cable routes back to the head-end or network cabinet, and their positions should be chosen according to coverage, building material, room use and future service access.
Our typical first-fix requirements are:
- Access points may be mounted on the ceiling or recessed into the ceiling, depending on the project and equipment selected.
- Access points must remain accessible after installation for future administration, replacement or cable testing.
- If an access point is mounted into the ceiling, allow a minimum recess depth of 120 mm.
- Access point cabling must route back to the head-end or network cabinet.
- Access point routes may be looped a maximum of two times only where the route remains serviceable and DG Technologies has approved the layout.
- Conduit must include draw boxes where necessary so that cables can be replaced later.
- Draw boxes must remain accessible after the ceiling is installed.
- Draw wire must be provided for our technicians.
The reason for the 120 mm ceiling allowance is simple: future service access matters. A shallow ceiling space may look acceptable on paper but become difficult when the actual access point, cable bend, connector, mounting method and hand access are considered.
Access point positions should also be checked against lighting layouts, air-conditioning grilles, beams, ceiling features, bulkheads, curtain pockets and speaker positions. A good Wi-Fi plan should not damage the ceiling design.
For larger homes, our network infrastructure work usually includes proper access point placement, PoE switching, cabinet planning and future support access.
Fibre point requirements
Fibre is often treated as a small item because the service provider brings the line into the property. In practice, the fibre route affects the whole technology system.
Our standard planning requirement is:
- Fibre must be accommodated with a single 20 mm conduit from the external fibre manhole or fibre entry point to the head-end cabinet.
- The route should be direct, serviceable and protected.
- The fibre equipment must have power at the head-end.
- The head-end should allow space for the fibre ONT, router/firewall and related network equipment.
If the fibre equipment ends up in the wrong place, the whole network starts from the wrong place. That often leads to messy patching, exposed equipment, poor Wi-Fi decisions or unnecessary additional cabinets.
Architects should confirm the likely fibre entry location early, especially on estate homes, large properties, long driveways and homes where external services are tightly controlled.
Dish point requirements
Even where streaming is heavily used, many homes still need satellite or dish provision for decoders, distribution or future flexibility.
Our typical requirement is:
- Dish point to have 1 x 25 mm conduit.
- The dish point should be positioned on the north-east side of the building unless the site-specific satellite line-of-sight requires otherwise.
- Dish point conduit must route back to the head-end.
- The route should remain serviceable, with draw boxes where required.
The final dish position should always be checked on site. Roof shape, parapets, neighbouring structures, estate rules and visual sensitivity can all affect the correct location.
TV point requirements
TV points are one of the most common areas where late planning creates problems.
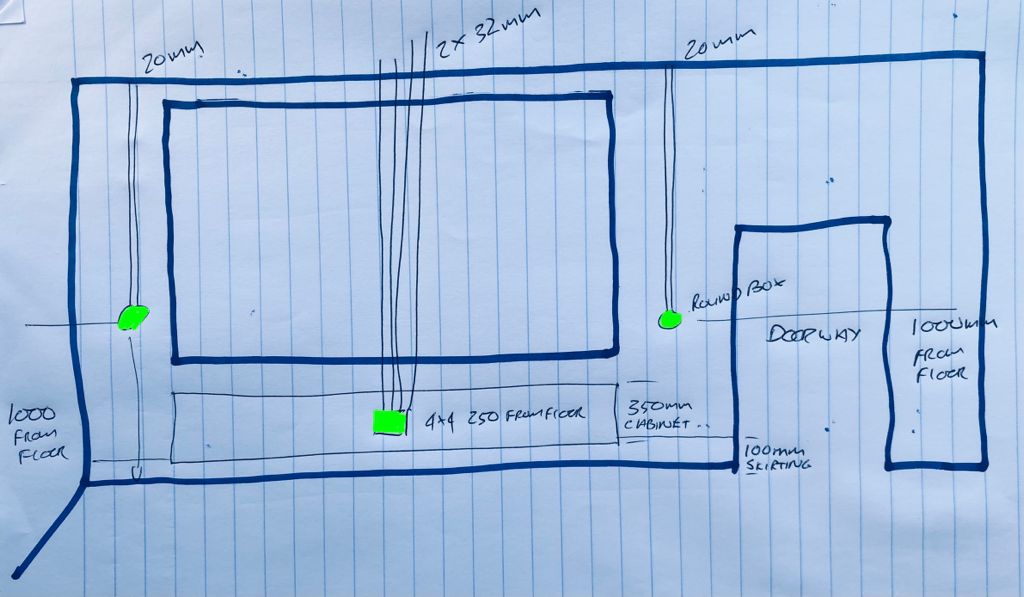
A TV point is not only a plug behind a screen. It may need data, HDMI, decoder provision, control, spare capacity, conduit to the rack, mounting height coordination and joinery coordination.
Our standard TV point requirements are:
- TV point to use a 4x4 box.
- A suitable 4x4 blank cover must be supplied by the person responsible for light switches and cover plates, so the finish matches the rest of the project.
- Standard mounting height is 1400 mm finished floor level.
- The final TV point height must be confirmed with the interior decorator, architect or joinery designer.
- TV conduit requires a 32 mm pipe directly to the head-end.
- TV wire must not be looped.
- Conduit must include draw boxes where necessary so future cable replacement remains possible.
- The run from the head-end to the furthest TV point should not exceed 40 m, including excess, unless this has been specifically discussed and catered for.
- Draw wire must be provided.
The 1400 mm height is a working default, not a design law. In some rooms the TV may be above a cabinet, inside joinery, on a feature wall, in a bedroom, in a bar, in a cinema space or above a fireplace. Those situations need coordination.
The important point is that the TV route should not be guessed. If the TV is important enough to appear on the architectural or interior design plan, the cable route behind it deserves the same care.
For AV systems, source and input planning also matters. We wrote more about this in why source and input planning matters in AV systems.
CCTV point requirements
CCTV points should be planned according to the view required, not only according to the easiest place to run conduit.
A camera must be able to see the useful event: a person at the gate, a vehicle in the driveway, an approach path, a boundary line, a patio entrance or a vulnerable area. A neat camera position that cannot identify anything useful is not a good security design.
Our typical CCTV first-fix requirements are:
- CCTV points are normally ceiling or soffit mounted, depending on the camera type and view required.
- Each CCTV point should have a 20 mm conduit route.
- CCTV routes may be looped a maximum of two times only where the design allows and replacement remains possible.
- Conduit must include draw boxes where necessary for future cable replacement.
- Draw boxes must be accessible after ceilings and finishes are complete.
- Cable routes should be protected from weather, tampering and physical damage.
- Camera cable should route back to the head-end, CCTV cabinet or approved area cabinet.
- Draw wire must be provided for our technicians.
Where a home is large, has outbuildings, has a long driveway or has boundary-wall camera positions, the project may need local cabinets, fibre links, wireless bridges, trenching or additional future provision. That should be reviewed on the drawings before work starts.
For estate homes, camera appearance also matters. Cameras should protect the property without making the architecture feel aggressive or messy. Our CCTV and security service treats camera placement as a design decision, not just a mounting decision.
Speaker and audio requirements
Speakers are visible in the final ceiling, so they need architectural coordination.
Speaker positions should be checked against downlights, air-conditioning, ceiling bulkheads, beams, sprinklers, curtain pockets, ceiling speakers in adjacent rooms, furniture layout and the way the room will actually be used.
For first-fix planning:
- Speaker routes must be agreed before ceilings close.
- Ceiling speaker positions should remain accessible until final speaker installation.
- Where recessed speaker positions or ceiling cavities are required, allow at least 120 mm where practical.
- Conduit size must match the project requirement and cable pull path.
- Draw boxes should be added where routes have more than two bends or where future cable replacement may otherwise become difficult.
- Speaker holes can sometimes be used as access points or “trap doors” for future cable pulling, provided this is planned intentionally.
- Draw wire must be provided.
The phrase “speaker point” sounds simple, but the final result depends on the room. A quiet kitchen background-music zone is not the same as a high-output patio. A cinema surround speaker is not the same as an in-ceiling multiroom speaker. A large open-plan area may need different thinking from a small bedroom.
For this reason, speaker specifications should be reviewed with the AV team before final ceiling layouts are locked. Our multiroom audio work starts with how the room will be used, not only how many speakers fit on a plan.
Conduit and draw box rules
Conduit sizing must be followed carefully. If the conduit is too small, has too many bends, is crushed, blocked or lacks draw points, the cable pull may fail or become unnecessarily difficult.
Our general conduit rules are:
- Use the conduit size specified for each component.
- If a conduit route has more than two bends, an accessible draw point should be installed.
- A round box or suitable draw box can be used where appropriate.
- Draw boxes must remain accessible after the ceiling, joinery or finishes are installed.
- Draw wire must be provided for our technicians.
- Conduits should be protected, serviceable and clearly understood by the electrician, builder and technology contractor.
The goal is not only to get the first cable installed. The goal is to make sure the cable can be replaced later if standards change, equipment changes or a fault develops.
This is why DG Technologies cares so much about first-fix planning. The client may never see the conduit, but the quality of the conduit route affects the quality and supportability of the home.
A quick first-fix checklist for architects
Before ceilings and walls close, confirm:
- Where is the head-end or rack?
- Does the head-end have power, ventilation, service access and cable entry?
- Has fibre been routed from the external entry point to the head-end?
- Is there a 25 mm dish conduit to the correct external position?
- Do all TV points have 4x4 boxes and 32 mm conduit directly to the head-end?
- Are TV point heights confirmed with the architect, decorator or joinery designer?
- Are TV cable routes below 40 m unless specifically designed otherwise?
- Are Wi-Fi access points correctly positioned and accessible?
- Is 120 mm ceiling depth available where APs or speaker recesses need it?
- Do CCTV points have useful views, not just convenient cable routes?
- Are conduit loops kept within the agreed limits?
- Are draw boxes included where there are more than two bends?
- Will draw boxes remain accessible after finishes?
- Has draw wire been provided?
- Are exterior routes protected from weather and tampering?
- Are future spare routes allowed where later changes would be expensive?
Why these small details matter
Most of these requirements are not glamorous.
A 32 mm pipe to a TV point does not impress a client in a showroom. A draw box does not look exciting on a mood board. A head-end location is not as emotionally appealing as a finished cinema room or a beautiful lighting scene.
But these details are what make the finished system possible.
When the first-fix planning is right, the technology disappears into the home. The Wi-Fi works. The TVs have the right routes. Cameras can be serviced. Speakers land where they should. Fibre starts in the right place. The rack is supportable. Future changes do not require damaging finished work.
That is the real value of early coordination.
For architects, builders and homeowners planning a serious home in Durban, Umhlanga, Mount Edgecombe, Zimbali, Simbithi, Ballito or elsewhere in KZN, DG Technologies can review the plans before first fix and help define the low-voltage routes properly.
Start with our builder and architect coordination page or speak to us about home automation planning in Durban and KZN.